Channel letter signs are a captivating and effective way to showcase a business’s name or logo. If you’re a beginner interested in learning how to create these eye-catching signs, this guide will walk you through the essential steps. From design and material selection to fabrication and installation, we’ll cover the fundamentals to help you embark on your channel letter sign-making journey.
What are Channel Letter Signs? For whom can channel letter signs be made?
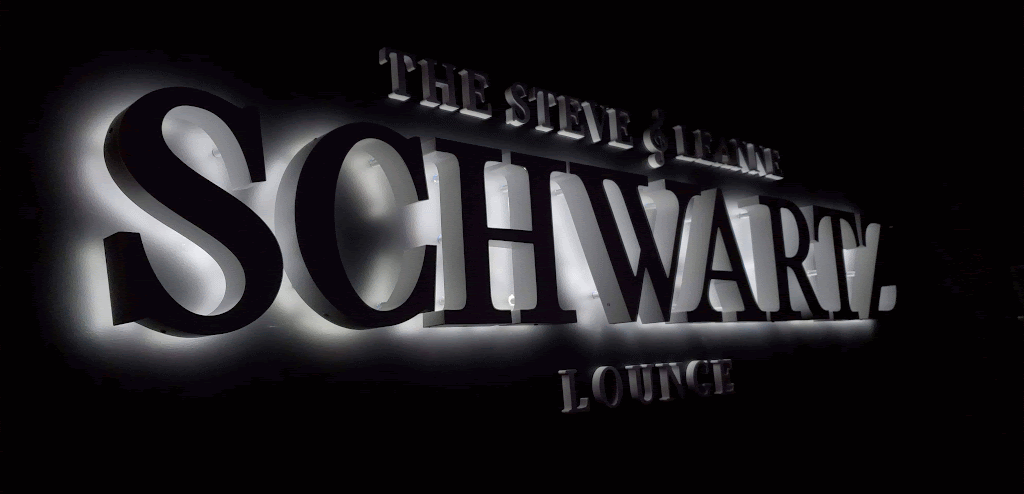
Channel letter signs are illuminated outdoor signs that can be easily installed on various types of buildings or properties. These signs typically feature letters, numbers, logos, or graphics, providing a visually striking and attention-grabbing display. Channel letter signs are versatile and can be customized to suit different industries and businesses.
They are commonly used by:
- Schools
- Hospitals
- Restaurants
- Performance venues
- Sports facilities
- Retailers
- Office parks
- Business towers
With a wide range of materials, mounting options, and display choices available, channel letter signs offer businesses the opportunity to stand out from their competition and make a lasting impression on customers.
By selecting the right design, materials, and lighting options, you can help businesses enhance their brand visibility and create a distinctive visual identity.
How to make channel letter signs
- Design and Conceptualization
The first step in making channel letter signs is to develop a solid design concept. Start by understanding the client’s branding and vision. Consider the size, font, color, and overall aesthetics that align with their identity.
Utilize design software or sketch out your ideas to create a digital rendering of the sign. This process allows you to visualize the final result before moving forward.
Once you have a design concept in mind, create templates for each letter or logo element. This will serve as a guide during fabrication. Consider factors such as the thickness and depth of the letters, which can impact the overall visual impact of the sign.
- Material Selection
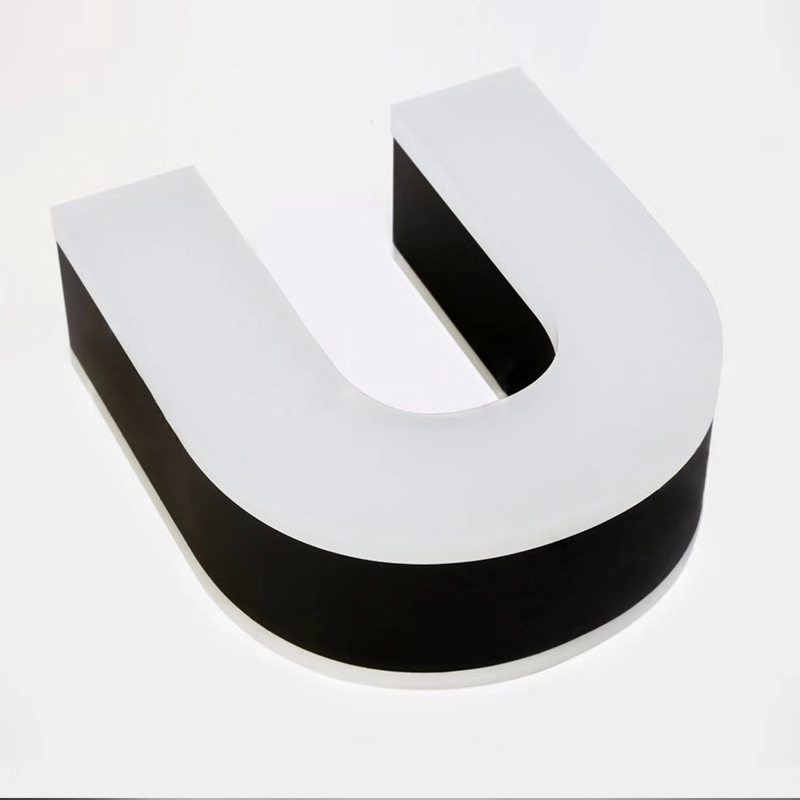
Choosing the right materials is crucial for the durability and visual impact of channel letter signs. Aluminum, stainless steel, and acrylic are commonly used options.
Aluminum is lightweight, easy to customize, and resistant to corrosion. Stainless steel offers a sleek and modern appearance, while acrylic provides a variety of color choices. Consider factors such as weather resistance, cost, and client preferences when selecting materials.
In addition to the main materials, you’ll also need translucent acrylic for the faces of front-lit signs or opaque acrylic for back-lit signs. These materials allow light to pass through or reflect off them, enhancing the visual impact of the sign.
- Fabrication Techniques
Fabricating channel letter signs requires several key steps. Begin by cutting the chosen material into the desired shapes and sizes. Specialized tools like CNC routers or laser cutters ensure precision and smooth edges. Take extra care when cutting intricate designs or curved shapes.
Next, use bending machines or manual techniques to shape the letters according to the design. Aluminum and stainless steel can be bent using appropriate tools, while acrylic can be heated and bent to achieve the desired shape. Ensure that the letters are uniform and correctly aligned to maintain a professional look.
Welding or bonding the components together is the next critical step. Aluminum and stainless steel letters can be welded using TIG or MIG welding techniques. Acrylic letters can be bonded using adhesives designed for acrylic bonding. Take care to maintain consistent spacing and alignment to achieve a visually appealing result.
- Illumination Options
Illumination is a key element that enhances the impact of channel letter signs, especially during nighttime. There are several illumination options to consider. Front-lit signs use translucent faces to allow light to emit through the letters’ front surfaces, creating vibrant and colorful effects.
- Back-lit signs: They also known as halo-lit signs, have opaque faces with lighting directed towards the wall behind the letters, producing a halo effect. Combination-lit signs incorporate both front and back illumination for maximum visual impact.
- Front-lit signs: Consider using LED modules or neon lighting. LED modules are energy-efficient, long-lasting, and available in various colors. Neon lighting provides a classic and vibrant glow but requires specialized skills for fabrication and maintenance.
- Open-Face: This letter style does not have a front face, leaving any bulbs or neon tubing inside the letters exposed. It can create a nostalgic and retro aesthetic, evoking a vintage feel. However, it’s important to note that the use of open-face letters may be restricted by lighting laws in certain regions.
- Installation and Wiring
Proper installation is crucial for the longevity and functionality of channel letter signs. Work closely with installers or follow installation guidelines carefully. Mount the letters securely, ensuring proper alignment and spacing.
Take care during the wiring process to route it discreetly through the letters, connecting the internal illumination to the power source. Attention to detail during installation ensures a visually appealing finished product.
- Finishing and Protecting the Sign
After fabrication, it’s important to give your channel letter sign a finished appearance and protect it from environmental elements. Consider options such as powder coating or painting the metal components for added durability and aesthetics. Apply a protective clear coat to the faces of the sign to prevent damage from UV rays, dirt, and weathering.
- Maintenance and Care
Regular maintenance is essential for preserving the appearance and functionality of your channel letter sign. Clean the sign faces periodically using mild soap and water, avoiding harsh chemicals that may damage the materials.
Inspect the sign for any loose components, damage, or lighting issues, and address them promptly. Consider scheduling routine maintenance to keep the sign in optimal condition.
Conclusion
Creating channel letter signs may seem daunting at first, but with a beginner’s guide like this, you can confidently embark on your sign-making journey. Remember to focus on design conceptualization, material selection, fabrication techniques, illumination options, and proper installation.
By following these fundamental steps, you’ll be able to craft visually striking and professional channel letter signs that make a lasting impression on businesses and their customers alike. With practice and experience, you’ll continue to refine your skills and take your sign-making abilities to new heights.